Once you build your own outdoor pizza oven, you'll be able to enjoy the combined pleasures of pizza, outdoors, and a wood fire for a unique experience that you'll love to share with family and friends. Your yard will become nothing less than a social mecca. After all, who can resist the allure of quick-baked pizza with the unmistakable umami of oak, maple, ash, beech, or birch wood smoke? Let an outdoor pizza oven complement your backyard patio or add to your outdoor kitchen.
How Do Pizza Ovens Work?
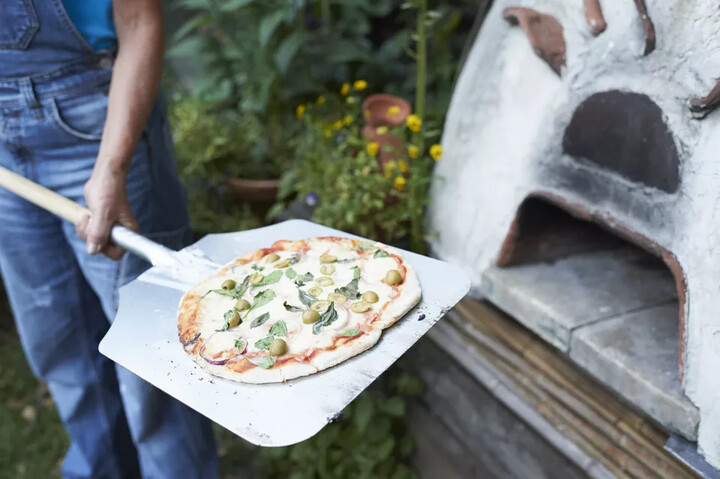
Wood-fired pizza is no gimmick or mere nostalgic throwback. The wood-fired oven's small masonry interior exponentially cranks up the heat to temperatures that far surpass anything found in your kitchen oven.
One secret of pizza dough cooked to chewy perfection is an extremely hot bake for short periods: often ranging from 750 to 1,200 degrees Fahrenheit for little more than a minute or two. The other secret, of course, is the rich, savory taste that the wood smoke imparts. It's a taste that no kitchen oven can match.
Codes and Permits
Check with your local permitting department about any building codes or zoning restrictions associated with building an outdoor pizza oven. If you live in a townhouse or other type of property controlled by a homeowner's association (HOA), you may need clearance from the HOA board before proceeding with the project.
Project Metrics
Working Time: 2 to 3 days
Total Time: 7 days
Skill Level: Intermediate
Material Cost: $300 to $400
What You Will Need
Equipment/Tools
Circular saw
Cordless drill
Tape measure
Rubber mallet
Tub for mixing concrete
Spray bottle filled with water
Metal snips or hacksaw
Jigsaw
Carpenter's pencil
Mason's trowel
Hammer
Masonry chisel
Materials
Quick-set concrete
4-foot by 4-foot piece of melamine-faced medium-density fiberboard (MDF) panel, common thickness 3/4-inch
Steel rebar mesh, 10 gauge, flush cut
Drywall screws, 1 5/8-inch long
Silicone caulk, black or another dark color
Release agent: mineral oil or paste wax
Decorative bricks
Mortar
Scrap cardboard
Scrap pieces of MDF, OSB, or plywood, each 18 inches by 18 inches
75 pounds of sand
Plastic sheeting
6-inch diameter by 2-foot round metal duct pipe
Instructions
Build the Bottom of the Mold For the Base
An outdoor pizza oven is essentially a contained wood fire, so you will need a solid, fireproof base. While you can create a base out of concrete pavers, a rough concrete slab cast specifically for this purpose gives you the greatest flexibility in terms of size and appearance. Cast the slab as close as possible to the eventual location of the pizza oven.
Build a mold out of melamine-faced MDF by first cutting a large piece for the bottom of the mold, then four side pieces. Cut the bottom piece to any size of your choice or 36 inches by 36 inches. With the snips or hacksaw, cut the mesh to 35 inches by 35 inches.
Build the Sidewalls For the Base Mold
With the circular saw, rip another piece of MDF wood into strips that are 2 3/4 inches wide and 36 inches long. Attach these sidewalls to the sides of the concrete mold bottom with the 1 5/8-inch drywall screws. Inject the silicone to all 90-degree angles in the mold and smooth down with your finger. After the caulk has cured, coat the mold with the release agent.
Pour the Concrete For the Mold
Mix the concrete and pour 1-inch of the concrete into the mold. Place the mesh atop the concrete, then complete the pour to the top. Vigorously tap the sides of the mold with the mallet to settle the concrete. Let cure for at least two full days, occasionally misting the concrete with water to prevent cracking.
Remove the Base From the Mold
After curing, carefully knock off the side form pieces. With assistance, flip the slab upside-down and remove the lower form.
Dry-Fit the Lower Bricks
To get a general sense of your outdoor pizza oven's footprint, lay out the bottom course of bricks on the concrete base. The pizza oven consists of two linked areas: the front arched opening and the back domed oven proper. The front opening will eventually have two double-stacked bricks side-by-side about 18 inches apart. Five bricks form the arch, and they rest on the double-stacked bricks. The rear dome will be more free-form. Begin it at the back of the arch. Form a near-circle so that it touches both sides of the arch. Halve bricks as needed with the hammer and masonry chisel.
Build the Front Arch Form
You will create the sides of the arch by mortaring together two stacks of two bricks. Place those double-stacked bricks about 18 inches apart to create the two side walls of the front arch.
Next, build a form for the arch. Set one of the 18-inch by 18-inch scrap boards on-edge across those stacks. With the carpenter's pencil, draw an arch that extends from the inner side of one wall to the inner side of the other wall. Remove, then lay the second board underneath. Cut out both arches at the same time with the jigsaw.
Build the Front Arch
Place the two arch forms about 3 inches apart from each other between the side walls. Support the arch forms underneath with a stack of bricks. Mortar five bricks together across the top of the arch form. One of the five bricks must be located at the center to act as a keystone. Mortar each side of the arch to the side walls. Let the arch fully dry before removing the arch form.
Create the Form for the Oven's Rear Dome
Once you have established a dome footprint to your satisfaction, mortar that bottom course directly to the concrete base. After that course has fully cured, create a form for the dome by mounding up sand. Mix the sand in the mixing basin with some water to moisten it and help it stick together. By hand, transfer the sand to the center of those bricks. Build the sand up to form a half-sphere. Cover the sand dome tightly with plastic sheeting.
Add the Brick to the Oven's Rear Dome
Brick over the sand dome. Mortar each course onto the course below. Also, mortar neighboring bricks. As you reach higher courses, liberally cut bricks in halves or in quarters for a closer fit. Stop adding brick when you reach a 6-inch diameter circle at the very top of the dome.
Create the Oven's Chimney
Insert the metal duct into the top opening of the dome. Make sure that it extends no farther down than the inside wall of the top of the dome. If the duct were to extend farther down, it may interfere with the pizza making operations and might not even draw smoke properly. Mortar the duct into place.
Mortar Over the Oven's Bricks
Mix up a large amount of mortar and apply it to the top of the pizza oven. Smooth the mortar down with the trowel and by shaping it by hand. This top coat of mortar gives the pizza oven its distinctive rounded shape.
Let Cure and Remove Supports
Wait about three days for the oven to dry and fully cure. First, remove the arch form and its supporting bricks. Then, reach back into dome area of the pizza oven and dig out the supporting sand. Be very careful to remove all sand and especially all of the plastic sheeting.
Complete Drying With a Small Fire
Before firing up the pizza oven to maximum temperatures, build a small wood fire to complete the drying process. Keep the fire small as you risk cracking the mortar and bricks if you heat up the oven too fast.